Basic Page Permissions and Workflow Configuration
These tasks are performed by the Revize WebSpace Administrator
using
the Revize Admin Center
All steps must be completed properly especially when using workflow.
Suggestion: Print this page and check off each item as completed.
Step 1: Create Roles Used by All Content Users:
ALL_CONTENT_EDITORS – grants general access to all content modules
All content editors must have permission to the content database modules (e.g. content, freeform, news etc) and links module if they are permitted to add links to new pages.
They are then restricted to which pages or sections they can edit in the last step.
- In AdminCenter on top navigation, click on ROLES
- When Roles screen appears click on New icon (upper left screen)
- When Create Roles screen appears, enter Role Name: ALL_CONTENT_EDITORS
- Click on Create
- Click on Permits icon next to ALL_CONTENT_EDITORS
- When Permissions screen appears,
- Click on New icon (upper right) and Create Permission screen appears
- Select content module (e.g. content, freeform, news etc) from dropdown
- keep All checkbox checked then click on submit
- repeat step 1 for each content module
DO NOT add permissions to webspace_config, webspace_permissions or any other non-content modules
- If all content editors are allowed to add links, repeat step 1 for the links module
ALL_LINK_EDITORS (optional) - grants permission to create links
Links can be embedded in rich text editor, the topnav, leftnav, quicklinks etc.
Granting permission to the links module usually only allows a user to create embedded links. To define permissions for the role:
- In AdminCenter on top navigation, click on ROLES
- When Roles screen appears click on New icon (upper left screen)
- When Create Roles screen appears, enter Role Name: ALL_CONTENT_EDITORS
- Click on Create
- When Permissions screen appears,
- Click on New button (upper left) and Create Permission screen appears
- Select links module
- keep All checkbox checked then click on submit
Step 2: Create Users for Each Deparment
Create users for each department
- In AdminCenter, click on USERS
- For each user that will be editing content, click on Roles icon next to each user
- Assign Role screen appears
- Always add ALL_CONTENT_EDITORS
- If they are allowed to create links, add ALL_LINK_EDITORS
- Click on Update button
If not using approval processes, skip to last step
Step 3: Create Production Stage, Channel & Email Configuration
This step is only necessary if workflow approval processes are used.
Create a “production” Stage
The stage defines a set of channels usually just one channel. This stage will be used for the production publishing channel(s). The production channels defines the location of live pages viewed by site visitors. Workflow approval processes will control when updates are published on channel(s) associated with this corresponding stage.
- In AdminCenter, click on STAGES
- Click on NEW
- Enter name of stage under label: e.g. production
- Leave checkbox for "Production Stage" UnChecked
Create a “production” Channel
This channel will point to a folder on the live site (usually on a different server than Revize)
- In AdminCenter click on Stages
- Location URL: website url
- Location: folder used to reference live site home page via file system or ftp
- Select the "production" stage
Define Email Server in revize.xml configuration file
- A mail server must be specified in the revize.xml file in the directory of:
[Revize_Install_Dir]\resin\conf\ on the Revize application server
e.g. C:\Revize\resin\conf\revize.xml
- Edit this file with a text editor such as Notepad and find the section of <email>...</email> and edit the smtpServer option
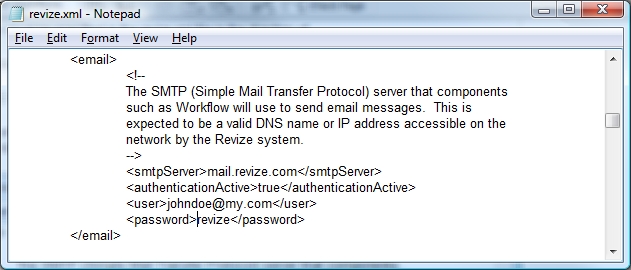
- Authentication is usually required
- user and password are usually not needed to send mail
if required you probably want to setup an email account reserved for Revize
Step 4: Create Default Workflow and Assign to DB Modules
The workflow editor uses a Java Applet and performs best on the actual Revize server. For best preformance, run directly from Revize server
Internet Explorer version 6 or greater Must best used.
DO NOT proceed if you have not completed Step 1, 2 and 3.
Create Default workflow
- in AdminCenter, click on WORKFLOW Workflow Editor will appear
- Name as Default Workflow for Workflow Name upper left corner
(name MUST be Default Workflow)
- Add state icons as shown below:

- Select publish icon
- Select “production” stage
- Click Save then close
Associate Default Workflow with all modules requiring approval
- In AdminCenter, Click on Associate Workflow in left navigation
- For each content Module to requiring approval (e.g. links, freeform, content)
- Check the Enabled checkbox
- Select Default Workflow from Workflow dropdown box
- Actual workflow is assigned by department/section as described in Step 5 (last step)
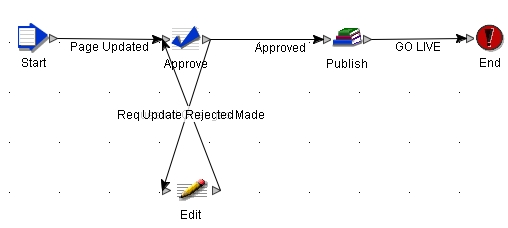
Step 5: Create Workflow for each Department
The default workflow will be used for all pages unless department workflow is defined and selected as described in Step 5.
Create workflow for Department
- in AdminCenter, click on WORKFLOW
- Workflow Editor will appear
- Workflow name (upper left corner): description name related to department
- Add Start, Approve, Publish, and End icons (in that order)
- Connect them by dragging the arrows
- Click on each line and label as shown below

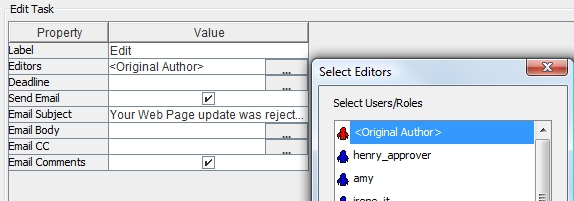
- Add Edit icon and position it above or below the Approve icon
- Connect the arrow coming out of Approve (right) into Edit (left)
label this line as "Update Rejected" - Connect arrow coming out of Edit and into Approve
label this lins as "Requested Changes Made"
- Connect the arrow coming out of Approve (right) into Edit (left)
- Lines cross-cross and lables overlap
(click on each line and view label in upper left corner)
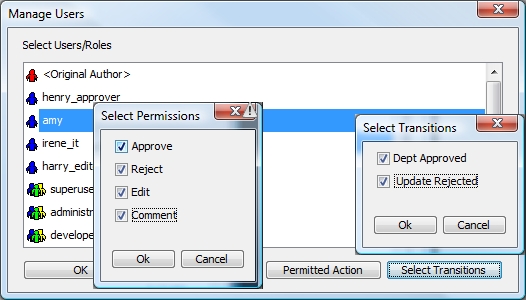
- Select Approve icon and set properties as shown below
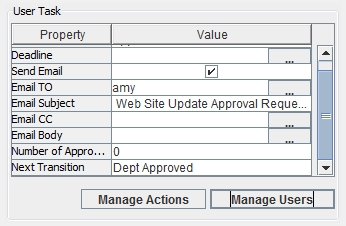
- Click on Manage Users button shown above
- select amy
- select Permitted Action and select All Permissions as shown below
- Click Select Transitions and select All Transitions
- close all popup windows for Approve icon
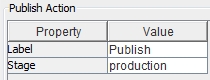
- select Publish icon and select Production stage as shown below
- Select Edit icon and fill in as show below:
- Click Save to close workflow editor
- If all setting are complete, you should see screen below
- Click on close

Step 5: Set Page Permissions & Workflow for Department Pages
Page Permissions and Workflows work similar to permissions on windows folders. When either a permission or workflow is assigned to a page, all lower level children pages inherit these settting unless they are set at lower level.
home page (permission defined)
|
|__HR Department (defines permission and workflow)
| |__HR link 1
| | |__HR sub link a
| | |__HR sub link b (defines new permission)
| |__HR link 2
|
|__IT Department
|__HR link 2
|__HR link 2
Example:
- Permissionsdefined on home page are inherited by all page in the site except HR department
No workflow is defined so the Default WorkFlow is used which publishes pages w/o approval - The department home page defines a permission or workflow therefore all pages created in the HR department inherit HR permissions (except sublink b) and uses the HR workflow on all pages
- sublink b uses permissions defined on that page and HR home page workflow
- IT department does not define permissions or workflow therefore home page permissions are used
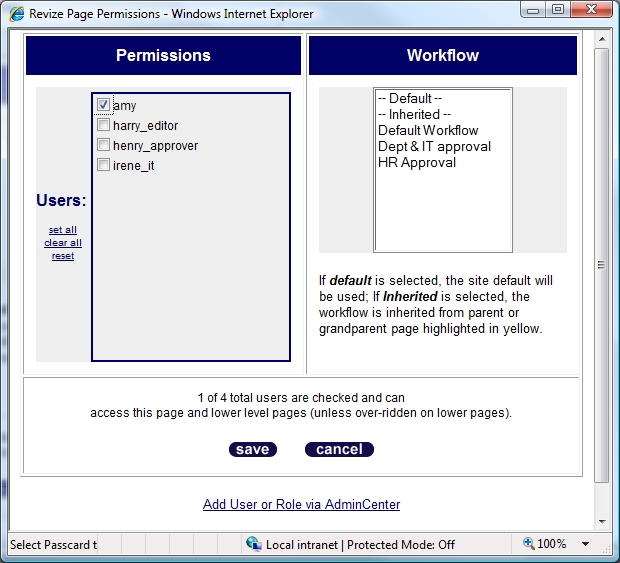
Set Page Permission on Web Site Home Page
If no permissions are set on home page, any user can edit the home page and all pages created from the home page unless permission is set for each page. It is strongly recommended that you set the home page permission to a site administrator.
Note any site adminstrator has permission to all pages regardless of what permission it set for the page or higher level pages.
Do the following override the site home page default:
- Browse to site and Login as administrator
- Click on permissions button and screen like the following appears
- Amy is an administrator and selected for this page
- No workflow is selected so the Default Workflow assigned in Step 4 will be used
Set Page Permissions and Workflow for Department Pages
- Browse to site and Login as administrator
- Browse to department home page
- Click on Permissions button
- Select the Permission and/or workflow that applies to this page and all pages created under this page